一、前言 因为本人是比较喜欢简约风格的,所以整个网站UI界面都是简约风格的,一个好的博客,应该让人一眼就能看清楚技术分类,文章也应该就是文章,让人能够最好的阅读你的博客,这才是我们应该做的,所以我的配置教程满满干货,没有太多花里胡哨的东西。接下来跟我一起来做吧:
二、开发工具
Git
Node.js
GitHub
HBuilderX
EDGE 浏览器 F12 开发者选项
三、Hexo 部署
部署方式请参考:基于GitHub+hexo部署静态Blog
四、配置文件说明 Hexo 中有两份重要的配置文件,其名称都是 _config.yml。
位于站点根目录的 _config.yml,主要配置 Hexo 本身。
位于主题目录的 _config.yml,主要配置主题相关的参数。
为了描述方便,在以下教程中,将前者称为 站点配置文件, 后者称为 主题配置文件。
1
2
站点配置文件 --> /hexo/_config.yml 主题配置文件 --> /hexo/themes/next/_config.yml
五、开始配置 1. 配置站点名、作者昵称和站点描述等内容 打开站点配置文件,搜索 Site,找到如下代码:
1
2
3
4
5
6
7
8
# Site title: # 站点标题 subtitle: # 站点副标题 description: # 站点描述 keywords: # 站点关键字 author: # 站长 language: # 站点语言,例如:中文(zh-CN) timezone: # 站点时区,例如:上海(Asia/Shanghai)
根据注释修改配置。
2. 新建标签及分类界面 打开主题配置文件,搜索 menu,找到如下代码:
1
2
3
4
5
6
7
8
9
menu: home: / || home #about: /about/ || user #tags: /tags/ || tags #categories: /categories/ || th #archives: /archives/ || archive #schedule: /schedule/ || calendar #sitemap: /sitemap.xml || sitemap #commonweal: /404 / || heartbeat
把 tags 和 categories 前面的 # 删除。
3. 切换主题 在主题配置文件 /next/_config.yml 中查找:scheme,找到如下代码:
1
2
3
4
5
# Schemes #scheme: Muse #scheme: Mist #scheme: Pisces #scheme: Gemini
选择你喜欢的一种样式(scheme),去掉前面的 #,推荐 Gemini 主题。
4. 隐藏网页底部 powered By Hexo / 强力驱动 打开 themes/next/layout/\_partials/footer.njk 文件,找到如下代码:
1
2
3
4
5
6
7
8
9
10
11
12
13
14
15
16
17
18
{% if theme.footer.powered.enable %} <div class="powered-by" >{# #}{{ __('footer.powered' , '<a class="theme-link" target="_blank"' + nofollow + ' href="https://hexo.io">Hexo</a>' ) }}{% if theme.footer.powered.version %} v{{ hexo_env('version' ) }}{% endif %}{# #}</div> {% endif %} {% if theme.footer.powered.enable and theme.footer.theme.enable %} <span class="post-meta-divider" >|</span> {% endif %} {% if theme.footer.theme.enable %} <div class="theme-info" >{# #}{{ __('footer.theme' ) }} – {# #}<a class="theme-link" target="_blank" {{ nofollow }} href="https://theme-next.org" >{# #}NexT.{{ theme.scheme }}{# #}</a>{% if theme.footer.theme.version %} v{{ version }}{% endif %}{# #}</div> {% endif %}
把这段代码首尾分别加上:<!-- 和 -->,或者直接删除。
5. 添加文章阴影 打开 /themes/next/source/css/\_custom/custom.styl 文件,添加如下代码:
1
2
3
4
5
6
7
.post { margin-top: 60px; margin-bottom: 60px; padding: 25px; -webkit-box-shadow: 0 0 5px rgba (202 , 203 , 203 , .5 ) ; -moz-box-shadow: 0 0 5px rgba (202 , 203 , 204 , .5 ) ; }
6. 浏览页面显示当前浏览进度 打开 themes/next/\_config.yml 文件,搜索 scrollpercent,把 false 改为 true。
效果图 :
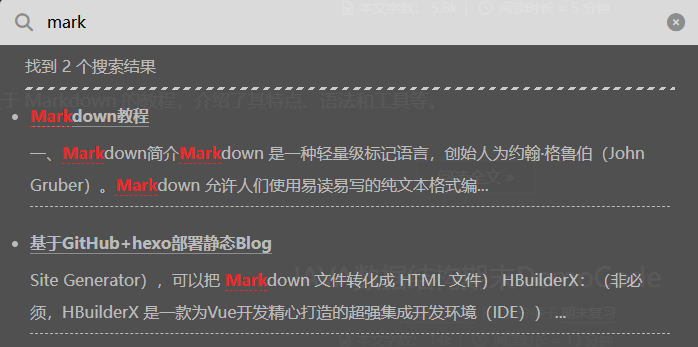
7. Local Search 本地搜索 安装插件 hexo-generator-searchdb,按 win+r 快捷键输入 cmd 回车,打开命令行工具,执行以下命令:
1 npm install hexo-generator-searchdb --save
修改站点配置文件,新增以下内容到任意位置:
1
2
3
4
5
6
#本地搜索 search: path: search.xml field: post format: html limit: 10000
编辑主题配置文件,启用本地搜索功能:
1
2
3
# Local search local_search: enable: true
效果图 :
8. 设置网站图标 你可以制作或找一个喜欢的图标,在 ZHANID /themes/next/source/images 文件夹里,并且修改主题配置文件:
1
2
3
4
5
6
favicon: #small: /images/favicon-16x16-next.png #medium: /images/favicon.ico #apple_touch_icon: /images/apple-touch-icon-next.png #safari_pinned_tab: /images/logo.svg #android_manifest: /manifest.json
去掉 medium 前面的 #。
效果图 :
9. 文章底部的 # 号的标签,改为图标 打开 /themes/next/layout/_macro/post.swig 文件,修改以下代码:
1 2 3 rel='tag' ># # 改为: rel='tag' ><i class="fa fa-tag" ></i>
效果图 :
10. 文章分享功能 打开themes/next/_config.yml 搜索关键字needmoreshare2 修改为下面设置
1
2
3
4
5
6
7
8
9
10
11
12
13
14
15
16
17
18
19
20
needmoreshare2: enable: true postbottom: enable: true options: iconStyle: default boxForm: horizontal #位置 position: bottomCenter #可分享网站 networks: Weibo,Wechat,Douban,QQZone,Twitter,Facebook float : enable: true options: iconStyle: default boxForm: vertical #位置 position: topRight #可分享网站 networks: Weibo,Wechat,Douban,QQZone,Twitter,Facebook
11. 文章加密访问 打开 themes->next->layout->_partials->head.swig 文件,插入代码:
1
2
3
4
5
6
7
8
(function(){ if ('{{ page.password }}' ){ if (prompt('请输入文章密码' ) !== '{{ page.password }}' ){ alert('密码错误!' ); history.back(); } } })();
写文章时在 Front-matter 部分加入 password,例如:
1
2
3
4
5
6
7
8
9
10
11
12
13
14
15
--- password: 123456 ---
12. 增加文章字数统计及阅读时长功能 安装插件 hexo-wordcount ,执行以下命令:
1 npm install hexo-wordcount --save
在主题配置文件中搜索 symbols_count_time,修改成如下:
1
2
3
4
5
6
7
8
9
10
# Post wordcount display settings # Dependencies: https: symbols_count_time: separated_meta: true item_text_post: true # 文章字数统计 item_text_total: true # 站点总字数统计 # 平均单词长度(单词的计数)。默认值:4 。CN≈2 EN≈5 俄文≈6 awl: 2 # 每分钟的单词。默认值:275 。缓慢≈200 正常≈275 快≈350 wpm: 275
13. 文章置顶功能 移除默认安装的插件:
1 npm uninstall hexo-generator-index --save
安装新插件:
1 npm install hexo-generator-index-pin-top --save
写需要置顶的文章时,在 Front-matter 区域,加上一行:
如果置顶多篇,怎么控制顺序呢?
答 :设置top的值(大的在前面)。
例如(文章 b 会显示在文章 a 的前面):
1
2
3
4
5
6
7
# Post a.md title: a top: 1 # Post b.md title: b top: 10
14. 设置置顶图标 打开 /themes/next/layout/_macro/post.swig 文件,在 <div class="post-meta"> 下方,插入如下代码:
1
2
3
4
5
{% if post.top %} <i class="fa fa-thumb-tack" ></i> <font color=7D26CD>置顶</font> <span class="post-meta-divider" >|</span> {% endif %}
15. 修改 Read More 按钮样式 修改 themes\next\source\css\_custom\custom.styl 文件,加入自定义样式代码:
1 2 3 4 5 6 7 8 9 10 11 12 13 14 15 16 17 18 19 .post-button .btn { color: #555 !important; background-color: rgb(255 , 255 , 255 ); border-radius: 3px; font-size: 15px; box-shadow: inset 0px 0px 10px 0px rgba (0 , 0 , 0 , 0.35 ) ; border: none !important; transition-property: unset; padding: 0px 15px; } .post-button .btn:hover { color: rgb(255 , 255 , 255 ) !important; border-radius: 3px; font-size: 15px; box-shadow: inset 0px 0px 10px 0px rgba (0 , 0 , 0 , 0.35 ) ; background-image: linear-gradient(90deg, #a166ab 0 %, #ef4e7b 25 %, #f37055 50 %, #ef4e7b 75 %, #a166ab 100 %); }
效果图 :
16. 修改阅读全文前显示文字数量即位置 打开 themes/next/_config.yml 文件,搜索 auto_excerpt, 修改 length 即可修改阅读全文前显示文字数量。
1
2
3
auto_excerpt: enable: true length: 150
或者在文章中加入 <!-- more --> 自定义在 Read More按钮之前要显示的内容。
17. 修改链接文字样式 打开 themes\next\source\css\_common\components\post\post.styl 文件,添加以下代码:
1
2
3
4
5
6
7
8
.post-body p a{ color: #0593d3; border-bottom: none; &:hover { color: #ff106c; text-decoration: underline; } }
18. 头像设置圆形,停留旋转效果 修改 themes\next\source\css\_common\components\sidebar\sidebar-author.styl 文件,新增以下代码:
1
2
3
4
5
6
7
8
9
10
11
12
13
14
15
.site-author-image { display: block; margin: 0 auto; padding: $site-author-image-padding; max-width: $site-author-image-width; height: $site-author-image-height; border: $site-author-image-border-width solid $site-author-image-border-color; + border-radius: 50 %; + transition: 2s all; } + .site-author-image:hover{ + transform: rotate(360deg); + }
19. 文章添加阴影效果(文章边框) 打开 themes/next/source/css/_custom/custom.styl 文件,新增以下代码:
1
2
3
4
5
6
7
.post { margin-top: 60px; margin-bottom: 60px; padding: 25px; -webkit-box-shadow: 0 0 5px rgba (202 , 203 , 203 , .5 ) ; -moz-box-shadow: 0 0 5px rgba (202 , 203 , 204 , .5 ) ; }
20. 近期文章 打开 themes/next/layout/_macro/sidebar.swig 文件,找到 theme.social 板块代码,在该板块最后的end if 后隔一行添加如下代码:
1
2
3
4
5
6
7
8
9
10
11
12
13
14
15
16
17
18
{# recent posts #} {% if theme.recent_posts %} <div class="links-of-blogroll motion-element {{ " links-of-blogroll-" + theme.recent_posts_layout }}" > <div class="links-of-blogroll-title" > <!-- modify icon to fire by szw --> <i class="fa fa-history fa-{{ theme.recent_posts_icon | lower }}" aria-hidden="true" ></i> {{ theme.recent_posts_title }} </div> <ul class="links-of-blogroll-list" > {% set posts = site.posts.sort('-date' ) %} {% for post in posts.slice('0' , '5' ) %} <li class="recent_posts_li" > <a href="{{ url_for(post.path) }}" title="{{ post.title }}" target="_blank" >{{ post.title }}</a> </li> {% endfor %} </ul> </div> {% endif %}
打开 themes/next/source/css/_common/components/sidebar/sidebar-blogroll.styl 文件,添加如下代码:
1
2
3
4
5
6
7
8
li.recent_posts_li { text-align: cengter; display: block; word-break : keep-all; white-space: nowrap; overflow: hidden; text-overflow: ellipsis; }
在 themes/next/_config.yml 文件中添加下方代码:
1
2
3
4
# 近期文章设置 recent_posts_title: 近期文章 recent_posts_layout: block recent_posts: true
21. 添加代码块复制按钮
说明 :Next6 中自带了复制代码按钮,Next5 需要自己手动配置。
在主题配置文件中搜索 codeblock,把默认配置改为如下配置:
1
2
3
4
5
6
7
8
9
10
11
12
13
14
15
16
17
18
19
codeblock: # Code Highlight theme # All available themes: https: theme: light: default dark: stackoverflow-dark prism: light: prism dark: prism-dark # Add copy button on codeblock copy_button: enable: enable show_result: true # Available values: default | flat | mac style: mac # Fold code block fold: enable: false height: 500
22. 添加加载特效 在主题配置文件中搜索 pace,找的如下代码:
1
2
3
4
5
6
7
8
9
10
11
# Progress bar in the top during page loading. # For more information: https: pace: enable: true # All available colors: # black | blue | green | orange | pink | purple | red | silver | white | yellow color: silver # All available themes: # big-counter | bounce | barber-shop | center-atom | center-circle | center-radar | center-simple # corner-indicator | fill-left | flat-top | flash | loading-bar | mac-osx | material | minimal theme: flash
根据注释进行修改。
23. 添加到顶部按钮 在主题配置文件中搜索 back2top ,把 enable 参数值设为 true。
1
2
3
4
5
6
back2top: enable: true # Back to top in sidebar. sidebar: false # Scroll percent label in b2t button. scrollpercent: true
24. 修改文章链接
优化 Hexo 永久链接格式常用的插件有 hexo-abbrlink hexo-abbrlink2
在 Hexo 根目录打开终端安装插件(hexo-abbrlink):
1
2
3
4
# 使用 npm 安装插件 npm install hexo-abbrlink --save # 使用 yarn 安装插件 yarn add hexo-abbrlink
修改 Hexo 的站点配置文件的 permalink 字段,例如:
1
2
3
permalink: posts/:abbrlink/ #文章结尾不带 .html # 或者 permalink: posts/:abbrlink.html #文章结尾带 .html
然后在 Hexo 的站点配置文件里增加 hexo-abbrlink 插件的配置代码:
1
2
3
4
5
6
7
8
9
10
11
12
13
14
15
# hexo-abbrlink abbrlink: alg: crc32 #支持crc16和crc32算法(默认crc16) rep: hex #支持dec和hex值(默认dec) drafts: false #(true )Process draft,(false )Do not process draft. false (default ) # Generate categories from directory-tree # depth: the max_depth of directory-tree you want to generate, should > 0 auto_category: enable: true #true (default ) depth: #3 (default ) over_write: false auto_title: false #enable auto title, it can auto fill the title by path auto_date: false #enable auto date, it can auto fill the date by time today force: false #enable force mode,in this mode, the plugin will ignore the cache, and calc the abbrlink for every post even it already had abbrlink.
默认情况下,新建文章后,abbrlink 插件会自动使用算法生成唯一的永久链接,例如:
1
2
3
4
5
6
7
8
#crc16 & hex https: # crc16 & dec https: # crc32 & hex https: # crc32 & dec https:
也可以在文章的 front-matter 部分手动填写 abbrlink 字段的值:
1
2
3
4
title: 优化 Hexo 的永久链接 toc: true abbrlink: hexo-permalinks #注意这部分 date: 2020 -06 -07 23 :35 :40
局限性 : crc16 算法 生成的最大文章数量为 65535,不过这个对绝大多数人都几乎没影响,如果一个 abbrlink 的值已存在,那么它会尝试其他可用的值。
25. 页脚添加访客量 在 footer 模板文件(themes/next/layout/_partials/footer.swig)底部添加以下代码:
1
2
3
4
5
6
7
8
9
10
11
<div class="powered-by" > <script async src="//busuanzi.ibruce.info/busuanzi/2.3/busuanzi.pure.mini.js" ></script> <i class="fa fa-user-md" ></i> <span id="busuanzi_container_site_uv" > 本站访客数:<span id="busuanzi_value_site_uv" ></span> </span> <span class="post-meta-divider" >|</span> <span id="busuanzi_container_site_pv" > 本站访问量<span id="busuanzi_value_site_pv" ></span> </span> </div>
26. 各版块透明度修改 26.1 内容板块透明化 博客根目录 themes\next\source\css_schemes\Pisces_layout.styl 文件 .content-wrap 标签下 background: white 修改为:
1 background: rgba(255 ,255 ,255 ,0.7 );
博客根目录 themes\next\source\css_schemes\Gemini\index.styl 文件 .post-block 标签下的 background: white 修改为:
1 background: rgba(255 ,255 ,255 ,0.7 );
26.2 分页板块透明化 博客根目录 themes\next\source\css_schemes\Gemini\index.styl 文件 .pagination 标签下的 background: white 修改为:
1 background: rgba(255 ,255 ,255 ,0.7 );
26.3 菜单栏板块透明化 博客根目录 themes\next\source\css_schemes\Pisces_layout.styl 文件 .header-inner 标签下 background: white 修改为:
1 background: rgba(255 ,255 ,255 ,0.7 );
博客根目录 themes\next\source\css_schemes\Pisces_sidebar.styl 文件 .sidebar 标签下增加一行:
26.4 站点概况背景 博客根目录 themes\next\source\css_schemes\Pisces_sidebar.styl 文件 .sidebar-inner 标签下 background: white 修改为:
1 background: rgba(255 ,255 ,255 ,0.7 );
然后修改博客根目录 themes\next\source\css_schemes\Pisces_layout.styl 文件 .sidebar 标签下 background: $body-bg-color 修改为:
1 background: rgba(255 ,255 ,255 ,0.7 );
26.5 评论区背景 博客根目录 themes\next\source\css_schemes\Gemini\index.styl 文件 .comments 标签下的 background: white 修改为:
1 background: rgba(255 ,255 ,255 ,0.7 );
27. 更改默认 Google 字体库
访问网站总是会耗费一大部分的时间在加载 google 字体库上, 而且经常加载不成功。我们可以用国内的 CDN库 来替代主题中的 google 字体库。
打开主题配置文件,搜索 Font Settings 字体库设置板块,把字体库服务器 host 改为国内CDN库(fonts.useso.com ):
1
2
3
# Uri of fonts host, e.g. https: #host: host: fonts.useso.com
28. 设置头像 把头像图片放至 themes/next/source/images/ 文件夹下,打开 themes/next/ 下的 _config.yml,查找 Sidebar Avatar。修改 url 的值
1
2
3
4
5
6
7
8
# Sidebar Avatar avatar: # Replace the default image and set the url here. url: /images/favicon.svg # If true , the avatar will be displayed in circle. rounded: true # If true , the avatar will be rotated with the cursor. rotated: true
29. 文章末尾添加版权声明 打开 themes/next/ 下的 _config.yml 文件,查找 creative_commons,进行以下修改:
1
2
3
4
5
creative_commons: license: by-nc-sa sidebar: false post: true # 将false 改为true 即可显示版权信息 language:
30. 配置代码块样式 在主题配置文件中,搜索 highlight根据注释修改:
1
2
3
4
5
highlight: enable: true #是否开启代码高亮 line_number: false #是否增加代码行号 auto_detect: true #自动判断代码语言 tab_replace:
31. 站点地图
站点地图的作用向搜索引擎提供你的网站的概要,给你的网站做 SEO。
安装插件
1 npm install hexo-generator-sitemap --save
在站点配置文件中添加配置项:
1
2
# Extensions plugins: hexo-generator-sitemap
修改主题配置文件,将对应注释打开:
1
2
menu: sitemap: /sitemap.xml || sitemap
执行命令重新生成源文件:
1 hexo clean && hexo g && hexo g
上述操作顺利的话,可以发现首页左侧边栏多了一项站点地图,点进去可以看到以 xml 格式组织的你的所有文章的 url。
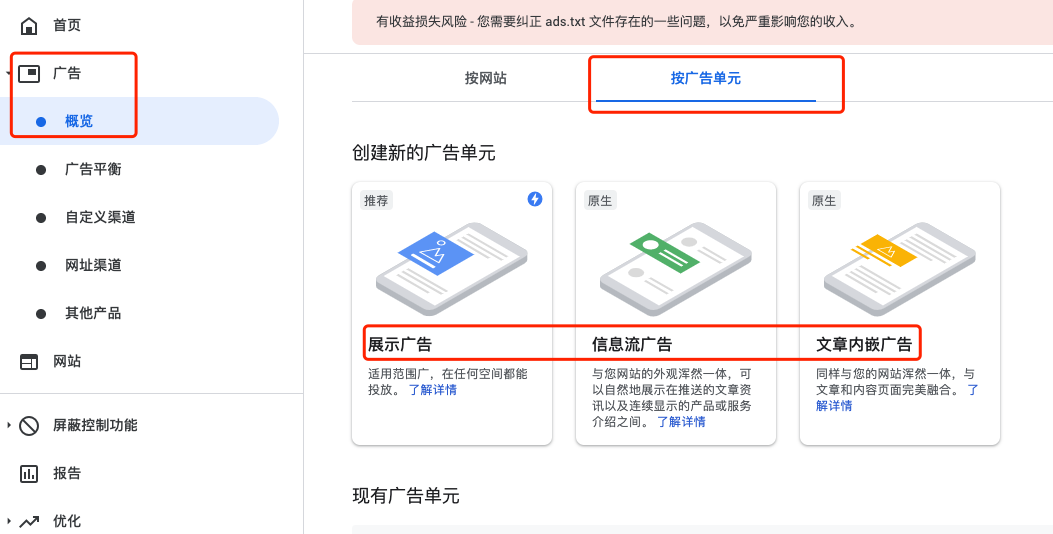
32. 广告 这里主要针对谷歌广告来说。
32.1 开通账号 众所周知,谷歌是全球最大的广告中间商,让你可以出卖流量来换小钱。具体做法是将你有流量的位置告诉谷歌,他会根据浏览你网站的用户行为来动态给他们推广告。
你可以在这里:https://www.google.com/adsense 开通,将你的网站提交,然后谷歌会给你审核。
32.2 嵌入代码 有个问题,如何兼顾页面美观性和广告数量、大小和位置间的平衡呢?这是个见仁见智的事情,推荐的做法主要有三点:
32.2.1 只做展示广告。 谷歌广告类型提供了三种。推荐选择展示广告,因为位置、大小可以受我们可以严格控制。
32.2.2 限制广告尺寸。 在定义广告的时候,在右侧边栏可以定义广告尺寸,如果是自适应的不好控制其页面上的呈现方式。我们可以限制到很小:280px * 100px,并且只放一个。
32.2.3 挑选放置位置。 推荐选在侧边栏最下面,并且用分割线隔开,这里需要自定义一些样式。定义css 可以新建一个自己的样式集:themes/next/source/css/_my/mycss.styl ,然后在 themes/next/source/css/main.styl 中引用即可:
只增加了一个样式:
1
2
3
4
5
6
7
.sidebar-ads { border-top: 1px dotted #ccc; width: 100 %; height: 100px; padding-top: 15px; margin-bottom: 5px; }
33. 修改站点页脚 在主题配置文件中修改网站页脚信息:
1
2
3
4
5
6
7
8
9
10
11
12
13
14
15
16
# themes\next\_config.yml footer: # 底部信息区 since: 2018 # 建站时间 icon: name: heart # 图标名称 animated: true # 开启动画 color: "#ff0000" # 图标颜色 powered: enable: false # 隐藏由 Hexo 强力驱动 version: false # 隐藏 Hexo 版本号 theme: enable: false # 隐藏所用的主题名称 version: false # 隐藏主题版本号
默认主题下, 标题下方会显示文章的创建时间、文章的修改时间、文章分类信息等元数据,用户可以在主题配置文件中自定义设置需要显示的 meta 元信息:
1
2
3
4
5
6
7
8
# themes\next\_config.yml post_meta: item_text: true # 显示文字说明 created_at: true # 显示文章创建时间 updated_at: enabled: false # 隐藏文章修改时间 another_day: true # 只有当修改时间和创建时间不是同一天的时候才显示 categories: false # 隐藏分类信息
以上就是这期文章的全部内容了,希望可以帮到各位!!!